To format a hard drive simply means to wipe off every files stored in it away. While this may be required in some cases it wise to backup your important files first before you do it. Most times Pc users make the mistake of wiping off there important files altogether all because they want to format their hard disk, but that is not the best way to format your hard disk except you feel that all the files in it are either infected by computer virus or unnecessary to be backup . If there is any file you want to preserve then you will need to copy those file to a different storage device such as your external hard drive, flash drive, SD card, VCD or DVD. However sometime you may not have any storage device to backup your files to and you may think there is no other way to save you files so you need to wipe everything off since you need to format you drive. Another alternative for you is to partition you drive and copy all your needed files into the partition you have created.
How to partition your drive
- click or press your window logo button and open you start menu.
- point your mouse cursor to the menu computer or This pc in window 8 and 10.
- Type “Computer Management” in the search bar of the Start menu and press enter or right click on the icon computer or This Pc in Windows 8.1 or 10 and select "Manage" to open up the computer Management Tool.
- Click on Disk Management under the storage tree menu on the left side of the window and you should see all of the disks and their partitions on your computer.
- Right-click on the partition you wish to re-size and select the Shrink Volume option. In the example in the picture the (C:) drive is used. Note: There may be a partition named System Reserved. It is not recommended that you alter this partition at all.
- Enter the size you wish to shrink your drive to in megabytes (1000 MB = 1GB). Then click on the Shrink button. In this example the drive is shrunk by 10000 MB or 10 GB. Note: You cannot shrink your volume greater than the amount indicated in the Size of available shrink space in MB section.
- You should now see a new unallocated partition in your Disk Management window. Right-click on the unallocated partition and select the New Simple Volume option.
- The New Simple Volume Wizard. The New Simple Volume Wizard should popup. Click on the Next button to continue.
- Enter size of new partition. Enter the amount of memory you wish to allocate for your new partition and click on the Next button.
- In the example in the picture, the maximum memory available is allocated to the new volume.
- Give the new volume a letter name or path. Select from the menu, a letter name for your new partition and click on the “Next” button. The letter name chosen for the example in the picture is (E:). The letter name or path is used by Windows to identify and navigate to your new volume.
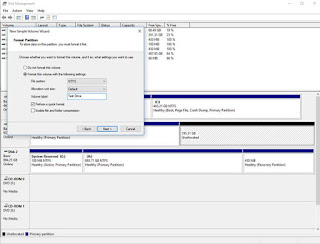
- Settings for the new volume.
- Click on the Format this volume with the following settings:
- For File System, select NTFS
- For Allocation unit size, select Default
- For Volume Label, type the name you wish to give your new drive.
- Click on the Perform a quick format
- Then click on the Next button.
- Continue to click through “Next” buttons and finally, hit “Finish” to create the volume. Your hard drive will now have a brand new partition with its very own designation. You’ll be able to see it, and all the information about it, on the Disk Management page.


Comments
Post a Comment